There are a few essential pages that every website should have. About, Contact us, Privacy Policy are some of them. Among these web pages, “Contact” page is such an important web page, which gives people a chance to connect with you, not only with text, but also sending files such as mp3, PDF etc. To build the interaction between you and people, you have to create a contact form and show it on your webiste.
You might have seen many websites and blogs use different types of contact forms. Some are HTML contact forms (They’re simple, yet attractive), others are PHP contact forms (Can add more features to contact form) which you can customize as you want. Ex: Use SQL to store data
Also, you might find that some bloggers use custom contact forms or third party contact forms for their websites. This allows them to use different types of form templates. Some contact templates are free while others are premium (paid). Many of those services provide various features to add to contact forms. For some instances, you can add a CAPTCHA protection to your contact form (But who will try to spam?). If you need to let your customers to send you anything like a source code file of a landing page, you can put an ‘upload’ option below the contact form.
In Blogger, you can use the Contact form widget on the sidebar or embed Blogger contact form on special pages. If you were able to customize the theme of contact form, you cannot change its settings. I mean, you can’t change the email address which you will receive the messages. That’s a reason why you should go for another option to create a contact form for your blog that can be customized as you want.
Google drive is
a free service which lets you to store files online on Google servers free. Not only they offer free 15 GB storage and give the ability of file syndication, Google drive also allows you to create forms, presentations, Docs and text files online using the tools. You can share them among your friends or embed on any web page. Besides, you can connect more apps with Google drive and create different types of files online.
Google forms is the application for creating forms. You can use it for creating different types of web forms like emergency contact forms. Not only you can create forms on Google drive, they also can be shared and embed easily. Here I will use Google forms to create a simple contact form. Before to this tutorial, I have already shown you how to create a simple contact form using Google drive. But you cannot change any settings of contact form. So in this tutorial, I will show you how to change the email address that you receive the messages. It's very useful, if your inbox is busy!
Step 1: Go to Google Drive https://drive.google.com and click on 'Create' button and then select 'Form'.

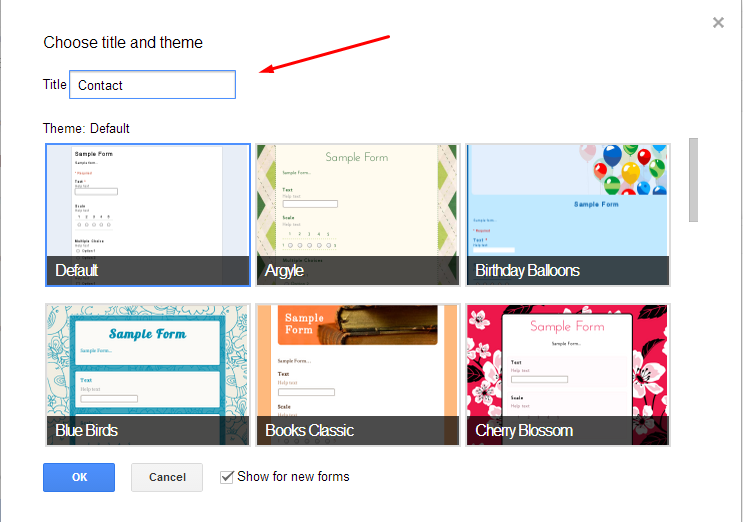
Step 2: Your new form would open in new tab. Type 'Contact' as the title of form. This is the title of your form, so you can change it as "Contact us", "Message Us" etc. Choose a theme and then click OK.
Step 3: Here in this step, you're going to set up the form fields. I will add three fields, Name, Email and Message (content).

Now you set up the basic fields of contact form. Lets move to next steps to changing the response destination.
Step 4: Click Choose response destination.

Step 5: Select New spreadsheet > Click Create. Now you created a spreadsheet to save the responses.

Step 6: Click View responses.

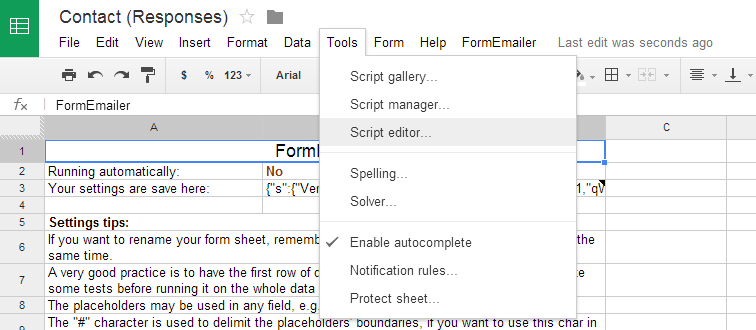
Step 7: You'd see response spreadsheet. There is no any response yet, because we haven't embed it. Now you have to install a script in order to send the message copy to the certain email. Click Tools > Script Gallery as shown below screenshot.

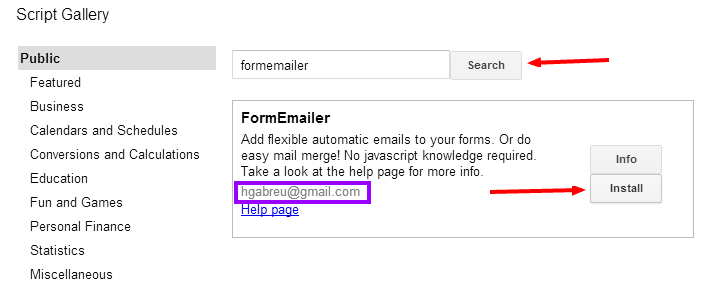
Step 8: Type formemailer > Click Search > Install (Make sure it's developed by hgabreu)
Step 9: Once you install the formemailer script, you would be asked to authorize in order to run the application. Don't worry, this script is safe, developed by Henrique Abreuhttps://sites.google.com/site/formemailer
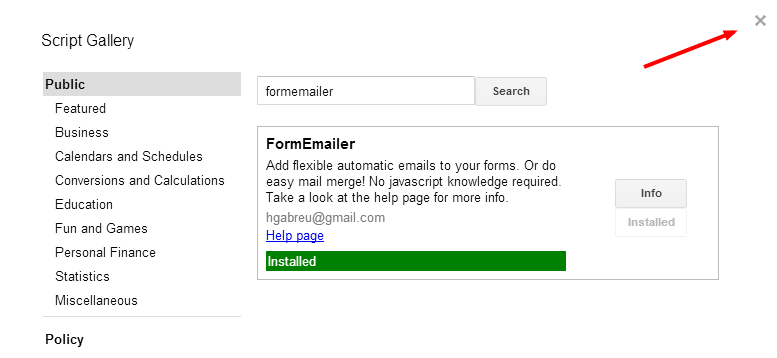
Step 10: You can close the internal pop-out window.
Step 11: Click FormEmailer > Install

Step 12: Select a Language and then click Install

Step 13: Click Tools > Script editor..., this will open a new tab
Step 14: In script editor tab, Click Resources > Current projects triggers...

Step 15: Click Add a new trigger > timeDriven - Time-driven - Minutes timer - Every minute > Click Save
You can close the script editor browser tab
Step 16: Back to spreadsheet browser tab, Click FormEmailer > Settings

Step 17: You can edit the email, subject, etc.
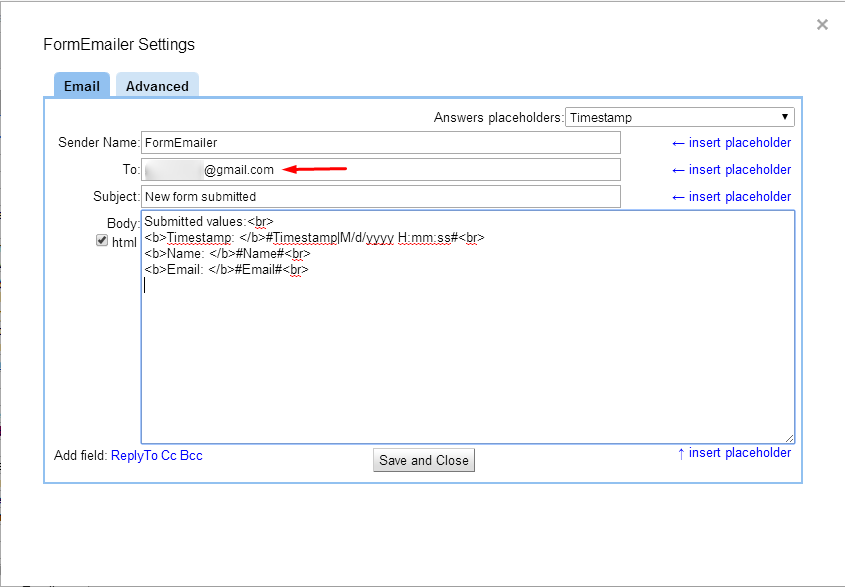 When you're using this script, you would not receive the message(content) to your email. So you have to add another code. Just after <b>Email: </b>#Email#<br/>, paste below code line.
(Optional) If you want to send a copy of message to another email, Click CC link under Add field and type your Email.

You can close the spreadsheet browser tab
Step 18: Click File > Embed
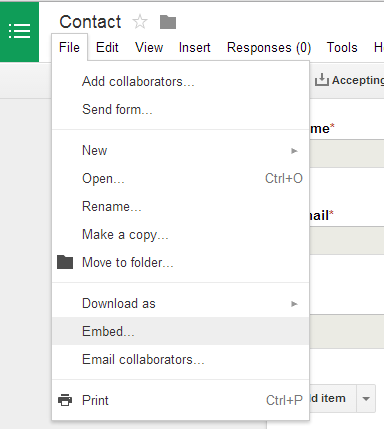
Step 19: Now you can copy and paste the HTML code to any HTML web page.

You can embed the contact form in any web page. For Blogger users, you can your page navigation menu. Also for Tumblr users, create a new static page and paste the HTML code. You can use a beautiful vertical page navigation menu to link to that page. Check out ourdemo page.

You might have seen many websites and blogs use different types of contact forms. Some are HTML contact forms (They’re simple, yet attractive), others are PHP contact forms (Can add more features to contact form) which you can customize as you want. Ex: Use SQL to store data
Also, you might find that some bloggers use custom contact forms or third party contact forms for their websites. This allows them to use different types of form templates. Some contact templates are free while others are premium (paid). Many of those services provide various features to add to contact forms. For some instances, you can add a CAPTCHA protection to your contact form (But who will try to spam?). If you need to let your customers to send you anything like a source code file of a landing page, you can put an ‘upload’ option below the contact form.
In Blogger, you can use the Contact form widget on the sidebar or embed Blogger contact form on special pages. If you were able to customize the theme of contact form, you cannot change its settings. I mean, you can’t change the email address which you will receive the messages. That’s a reason why you should go for another option to create a contact form for your blog that can be customized as you want.
Google Drive and Contact forms
Google drive is
a free service which lets you to store files online on Google servers free. Not only they offer free 15 GB storage and give the ability of file syndication, Google drive also allows you to create forms, presentations, Docs and text files online using the tools. You can share them among your friends or embed on any web page. Besides, you can connect more apps with Google drive and create different types of files online.
Google forms is the application for creating forms. You can use it for creating different types of web forms like emergency contact forms. Not only you can create forms on Google drive, they also can be shared and embed easily. Here I will use Google forms to create a simple contact form. Before to this tutorial, I have already shown you how to create a simple contact form using Google drive. But you cannot change any settings of contact form. So in this tutorial, I will show you how to change the email address that you receive the messages. It's very useful, if your inbox is busy!
Create A Simple Contact Form Using Google Drive
Step 1: Go to Google Drive https://drive.google.com and click on 'Create' button and then select 'Form'.

Step 2: Your new form would open in new tab. Type 'Contact' as the title of form. This is the title of your form, so you can change it as "Contact us", "Message Us" etc. Choose a theme and then click OK.

Step 3: Here in this step, you're going to set up the form fields. I will add three fields, Name, Email and Message (content).
- On question title, type "Name" > select Text on question type > check on Required question > click Add item
- On question title, type "Email" > select Text on question type > check on Required question > click Add item
- On question title, type "Message" > select Paragraph Text on the question type > check on Required question > click Done

Now you set up the basic fields of contact form. Lets move to next steps to changing the response destination.
Step 4: Click Choose response destination.

Step 5: Select New spreadsheet > Click Create. Now you created a spreadsheet to save the responses.

Step 6: Click View responses.

Step 7: You'd see response spreadsheet. There is no any response yet, because we haven't embed it. Now you have to install a script in order to send the message copy to the certain email. Click Tools > Script Gallery as shown below screenshot.

Step 8: Type formemailer > Click Search > Install (Make sure it's developed by hgabreu)

Step 9: Once you install the formemailer script, you would be asked to authorize in order to run the application. Don't worry, this script is safe, developed by Henrique Abreuhttps://sites.google.com/site/formemailer
Step 10: You can close the internal pop-out window.

Step 11: Click FormEmailer > Install

Step 12: Select a Language and then click Install

Step 13: Click Tools > Script editor..., this will open a new tab

Step 14: In script editor tab, Click Resources > Current projects triggers...

Step 15: Click Add a new trigger > timeDriven - Time-driven - Minutes timer - Every minute > Click Save
Step 16: Back to spreadsheet browser tab, Click FormEmailer > Settings

Step 17: You can edit the email, subject, etc.

<b>Message: </b>#Message#<br/>
(Optional) If you want to send a copy of message to another email, Click CC link under Add field and type your Email.

You can close the spreadsheet browser tab
Step 18: Click File > Embed

Step 19: Now you can copy and paste the HTML code to any HTML web page.

How can I add Contact form?
You can embed the contact form in any web page. For Blogger users, you can your page navigation menu. Also for Tumblr users, create a new static page and paste the HTML code. You can use a beautiful vertical page navigation menu to link to that page. Check out ourdemo page.
Need a Proof how it works?

That's all. Google Drive contact form is an alternative to Blogger contact form. Not only you can add Name, Email and Message inputs, you can also add further fields such as Phone number to the contact form. These features will help you to create custom contact forms which enable to collect more data from your visitors.
If you find this tutorial is informative, please spend a few seconds to share it with your friends.
If you find this tutorial is informative, please spend a few seconds to share it with your friends.


0 comments:
Post a Comment
please feel free to leave comments